
Backing up your website is one of the fundamental aspects of web security. So much can happen on the Internet: Hackers strike. Servers go down. Files get corrupted. Any number of calamities can befall your website and wipe out years of hard work.
With the Web being so dangerous these days, it’s crucial to have a complete copy of your precious website files on hand in case of a disaster.
Question is, how are you going to backup your files? And, once you backup, how can you be sure the files will work on a new install?
In this tutorial we’ll discuss ways to backup and restore WordPress sites.
These techniques are useful not just in the case of disaster, but also for migrating a site to another web server, which is something you might otherwise pay a developer to do.
Restore WordPress site in two parts
 When backing up and restoring a site, it’s important to know that there are two parts of the installation: WordPress files and your database.
Think of the database as your brain and WP files as your home.
Your brain contains all the thoughts and memories you’ve accumulated over the course of your entire life.
 Your home is where you store your brain to protect it from the great outdoors.
But if your home was lost, you could always get a new one, thanks to homeowners insurance. If you loose your brain, you will need to be reborn in order to accumulate all the data you lost.
Which is more valuable?
WordPress php files consist of the following:
- WordPress Core Installation
- WordPress Plugins
- WordPress Themes
- Images and Files
- JavaScript and PHP scripts, and other code files
- Additional Files and Static Web Pages
The MySql database contains posts, pages, comments, categories, tags, custom fields, users, and other options such as site urls etc. generated on your site,
The database requires the WordPress core files to manipulate the organization of its information on your site.

Backing up is not hard to do
There are lots of ways to back up your files and database. Here are most of them.
Hosting Backup
Your web host will provide a regular back up of your site if you ask them to or pay for it. Each host is different so ask yours what they offer.
Backup Plugins
There are lots of backup plugins to choose from. They perform the backup similarly by placing the files on your server directory, but they offer different features.
Backup plugins feature:
- Optimization by purging unused data from your files
- Sending backups to server, email, Dropbox, hard drive
- Schedule automatic backups
- Storage options like FTP, SFTP and FTPS
Personally, I like Simple Backup because it optimizes my WP files and database before storing copies on my server. I don’t want to save every single revision of every single post. Also, Simple Backup makes it easy to download the backups to my server.
Another helpful plugin is Duplicator, which packages your files and helps you upload them to a new server. A lot of people like Duplicator, but not me. I’d rather do things manually.
Here is a list of some of the most popular backup plugins compared.
WordPress Export
The quickest way to make a backup is by going to Tools>Export and installing the WordPress export plugin.
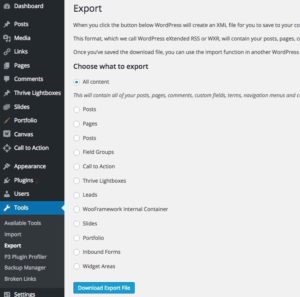
Once installed, you can export all or some of your files into a single XML file and download that to your hard drive This file format, WordPress eXtended RSS or WXR, will contain your posts, pages, comments, custom fields, categories, and tags.
The XML file download is quick and easy and good for simple content sites. Below, I’ll show how to import that XML file into a new WordPress installation.
General Backup Tips
Spread out backups
The WordPress Codex and current consensus recommends keeping at least three backups on file, in case of corruption or loss, and to store the backups in different places on different mediums – CD, DVD, external hard drives, Cloud storage, Drop box – as well as on your hosting server.
Time your backups
Always, everytime and routinely backup your site before upgrading to a new version of WordPress. Before upgrading your theme or any plugins, hey, it can’t hurt to backup.
Read More: New Year’s Internet Resolutions You Can Make Too
Restoring or migrating
Once you’ve made a backup of your site, it’s a good idea to upload the backup to a new WordPress environment.
Restoring your site proves that all your files are intact and non-corrupted, so if disaster strikes, you have peace of mind knowing those files work.
The caveat here is that your backup should be pristine and untainted by hacking. If your files have bugs it makes no sense to spread those bugs to another server.
Restore with XML file
Restoring a site with an XML file is the easiest, fastest way to move your site to another place.
XML is a single file that contains pure code and is best used on simple sites. Once you’re moved the XML file into the new house, you’ll need to spend a lot of time rearranging the furniture in order to match the old house.
Here’s how you do it:
- In Tools>Export, install an Export plugin and export All Content.
- Install a new WordPress on desired server and install the sites Theme there.
- Change new installation’s Reading settings to match the original site – ie. Posts or Static front page. If static, create Home and Blog pages first.
- Change Permalinks to match old site.
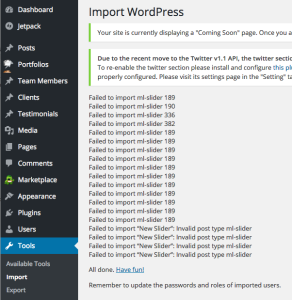
- Install WP Importer plugin in Tools>Import. Assign Authors – Import Attachments, Media, posts, pages, portfolio.
There’s lots to customize here, especially menus, sliders, front page. But at least the move was fast and easy.

Restoring Manually
Using a plugin, back up and download the .tar and .sql files to your hard drive.
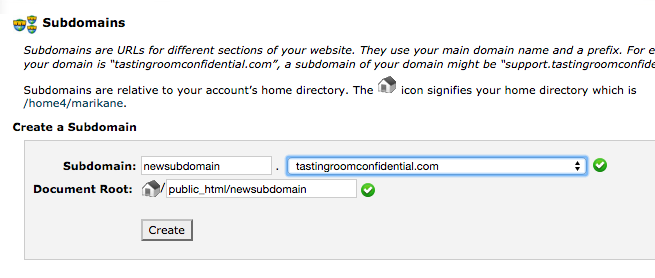
In Cpanel, create a subdomain on the new server. Something like http://newsubdomain.olddomain.com will be your URL for this restored site.
Create ftp client for that subdomain if your zipped WP files (.tar) exceed the server’s upload limit of say, 500MB.
Open that new directory and upload your .tar.zip file. Or use the ftp client to transfer larger files.
Extract tar.zip and copy or move files to the new subdomain directory.
Now that everything is in place, you need to make your brain aware of its new house.
Create new database
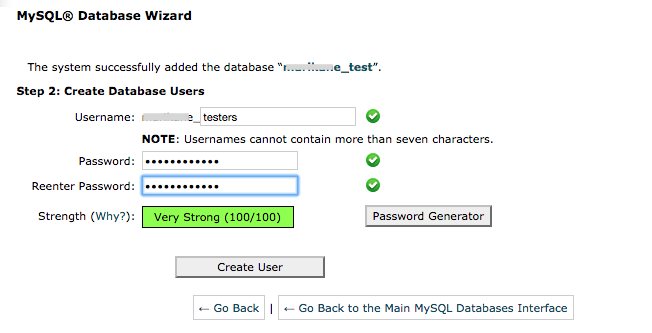
In Cpanel, click on MySql Database Wizard
- Create a database
- Create Database User(s)
- Assign Privileges (all)
Import .sql database
In Cpanel click on phpMyAdmin. Find and click on your new database. Click Import. Browse to .sql file and upload. Hit Go.
Edit Database Options
Click Options, click edit and change URL and Sitename to new subdomain name.
Do Search for old URL and name and update accordingly.
Edit Config.php file
In Cpanel, go to File Manager and navigate to Public folder. Find and open the new directory. Select the config.php file and click on Edit tool.
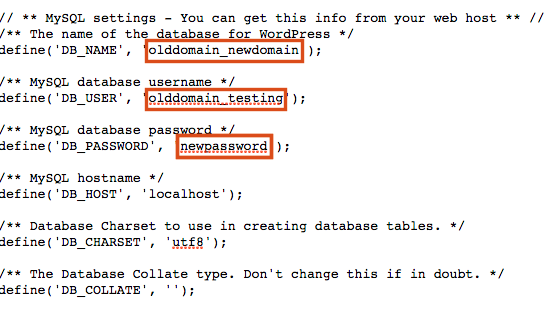
Change the MySQL database name, username and password according to the above. Save changes.
Enter newsubdomain.olddomain.com and check your work. All should look the same as the original site.
Add /wp-admin (or your custom extension) and login. Check your image links to ensure they are pointed correctly, or change them.
Try it, you’ll like it
If you’ve never worked with your server files or database, restoring a WordPress site might be a cathartic exercise for you. Nothing will build your confidence more than successfully preserving your website’s files and migrating them to another location.
Compete digital satisfaction, that’s what it is.
What about you? Have you backed up and restored a site? How did you do it?
And if you haven’t already, please subscribe to Blogsite Studio and get my free ebook, Escalate Your WordPress Website. Cheers!
