People are visual creatures. Before there was language and writing, there were pictures. Just look at the walls on the Chauvet Cave in France. Cave people drew those images to describe animals because they weren’t ready to say things like, “Cow will charge when angry.”
Our relationship with images has not changed all that much in the last million years. Today we crave photographs, illustrations, charts, graphics, infographics, video, and animation to help us make sense of our world. The only things that have changed are the mediums.
Which brings me to images in WordPress. When done right, optimized images will increase your site’s page views, encourage clicks in search, prompt sales and conversions, and increase social engagement and shares.
[Tweet “Images are not just easy on the eyes, they can add important metadata to your site”]
Why? Because images are not just easy on the eyes, they can add important metadata to your site.
It’s extremely important to be optimizing images every way possible to improve your Search Engine Optimization (SEO) as well as the user experience. Here’s how:
Size Matters

Whatever you do, DO NOT IMPORT IMAGES STRAIGHT FROM YOUR CAMERA INTO WORDPRESS!
Most camera image sizes are in the quadruple digits and if you load them into WordPress you might as well add a thousand pound ball and chain to your site. Excessive image size is the biggest possible drag on your site’s page speed.
Instead, format your images in a photo program like iPhoto or Photoshop. Crop and enhance the images first, then save them in a reasonable size according to your’s theme specifications.
I use iPhoto, and by exporting as a Medium file, the jpeg images are saved at about 640 x 300 pixels and weigh in at between 20 – 70 kilobytes per image. (At least they used to before I updated to Yosemite, which doesn’t give me this option.)
Compare that with the average 4000 x 3000 px 13 megabyte camera raw image and it’s no wonder your site is slower than 80% of all sites. Even a .jpeg of those proportions will come in at 1.3 mb.
Using a plugin like WP Smush helps to further reduce the size of your images without a loss of visual clarity.
Read More: How to Manage Photos in WordPress
File Types Differ
The other part of optimizing your images for WordPress involves choosing the appropriate file type. Currently, there are three image files types WordPress will accept but they are all different. Here’s a cheat sheet:
.jpeg (or .jpg)
More or less standard of the Internet, JPEGs look good when compressed to very small sizes. Use JPEGs for photographs and you can’t go wrong.
.png
PNGs are a good alternative to JPEGs, as they are sharper, support more colors, and they won’t degrade with re-saves. But all that quality will cost you in size. My PNGs tend be double or triple the size of my JPEGs, so I don’t use them as much.
.gif
GIFs don’t support so many colors and as images, they are very low in quality. What GIFs are good for are graphics such as your logo, page icons as well as short animations.
Title
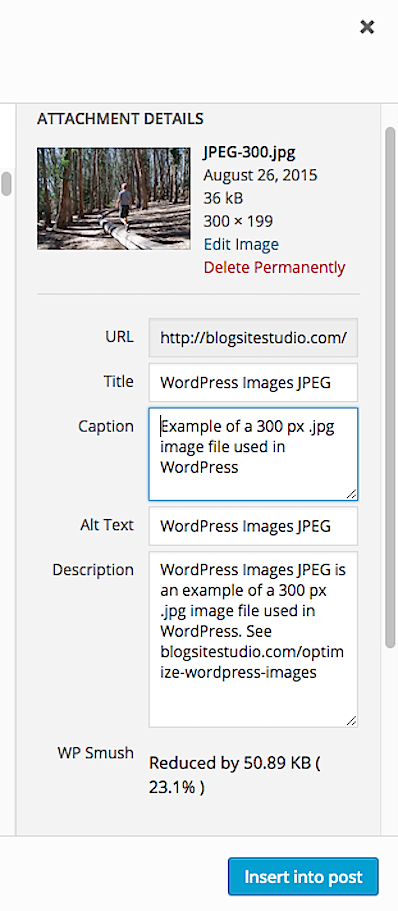
When you save your image, give it a good descriptive title with space separation. That will save you time when you upload the image to the WordPress Media Library.
If you change your mind about the title, you can change it after uploading in WordPress’s Media Library. Titles are not necessarily seen by readers until they are clicked on.
Good optimization means use of keywords. If your post is about best digital cameras and you are using “best digital cameras” as your focus keyword, then it’s a good practice to name your images, “best digital cameras nikon,” for example, or “best digital cameras canon” to include those keywords.
Caption
Captions appear beneath your image to provide a specific description of what’s happening in the image.
The caption should be written in sentence format and may contain keywords. Although a caption doesn’t contribute to indexing in search what it does is improve the user experience by helping the reader scan information.
But not all captions are coded alike. They work for me on this site, but on my wine site captions totally screw up the layout.
Alt Text
Alt Text exists to help blind people and search spiders know what the image is about. Without the Alt Text the search spiders is just as blind as a blind person, so you want to give it something to read.
Alt Text is crucial to optimizing your images, so don’t diss it. The easiest approach is to simply copy and paste your Title into the Alt Text field, deleting the .jpg. Include your keywords in Alt Text, but don’t overdue keywords to the point of appearing spammy.
For better optimization, add more descriptive words about the image, but don’t go overboard. Save extrapolations for Description.
For images with text, put the exact text in the Alt Text field followed by a description like, “Logo” or “banner.”
Description
Description is what readers see when your image comes up in Google Images, for instance.
Here is where you can place all your Title text, keywords, URLs and marketing blather in sentence-formatted style. You can also use HTML markup to add links to the Description.
Yoast for Images
If you have the Yoast SEO plugin installed, you can go nuts optimizing your images in WordPress. You’ll find the same SEO edit box in your Media Library as you see on Posts and Page. Enter your focus keyword, use Page Analysis and go bonkers!
Read More: Using WordPress SEO by Yoast
Optimizing Images is worth the effort
Yes, sure, optimizing images take extra time and thought and can be a distraction from the real fun of blogging. But if you get into the habit early on, it will become second nature in your work.
Basically, there’s no excuse for not optimizing images. The only thing that stops me is my uncertainty about using the image.
What do you do? Are you optimizing images? Do you optimize as you load images or do them all at once at the end? Tell me. I love to know about other people’s work habits.
Sources: Jeff Bulas, Shopify, Yoast, Mor10
Interesting article Mari,
Although I use Serif PhotoPlus and DrawPlus to process images and drawings I also use Shrink-O-Matic (v2.0.3) by TOKI WOKI. This is good at shrinking images to a suitable size by looking in one folder and placing the shrunk items in another. It can also be used to add overlays such as copyright info (PNG’s with transparent backgrounds) at the sides, centre or corners. It can also rotate and change format. e.g. 20 images can be dragged from a folder onto it and they will all be processed and be given a different name (if required) before being returned to the original or alternative folder – overwriting the originals as appropriate.
I make a lot of my images exactly twice the height and width they need to be in the blog so that they can be shown enlarged when clicked on. I feel my web space is at a premium and so I am careful not to upload images that are unnecessarily large.
Thanks Colin. Great ideas. I should try that Shrink-O-Matic. And yes, one doesn’t need to size images exactly the way they’re first intended, as there may be other ways to present them. Cheers!