You are a member of a group that has a WordPress blog and you want to contribute. But, you don’t know how to post on a WordPress blog. What to do?
Use this guide to get started blogging.
Login to WordPress Blog Dashboard
The administrator of your group must first give you a login and password to get into the “back end” of the WordPress blog. Go to the site itself and at the end the URL, type “/wp-admin,” ie. yoursite.com/wp-admin. This is a standard way to bring up the login page.
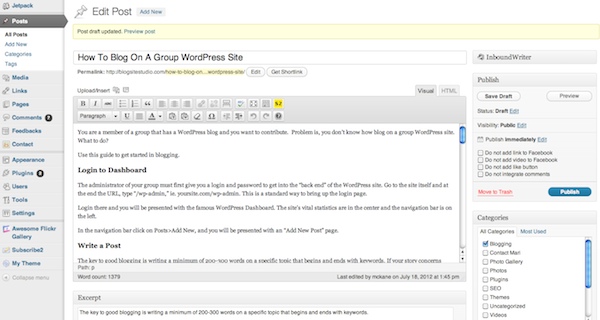
Login there and you will be presented with the famous WordPress Dashboard. The site’s vital statistics are in the center and the navigation bar is on the left.
In the navigation bar, click on Posts>Add New, and you will be presented with an “Add New Post” page.
Write a Post
The key to good blogging is writing a minimum of 200-300 words on a specific topic that begins and ends with keywords. If your story concerns blogging, then the word “blogging” must appear in the title, the first sentence, and several more times in the body of the post. Secondary keywords, like “WordPress” should be similarly repeated. A blog post is not the place to vary your language. For more about using keywords, see Keyword Basics for Blogging
It’s a good idea to compose the post in a word application in order to take advantage of functions not found in WordPress. But do not format your text there. Leave formatting for WordPress. Copy and paste clean text into the WordPress Post Editor and hit Save Draft. Close up paragraph breaks if necessary.
Format Post
There should be three rows of tool icons above the edit post box. If not, press the kitchen sink icon and that will bring up a very important row of tools that includes “Paragraph”, Underline, Justification, Colors, etc. While most of these tool merely add decoration, the Paragraph dropdown box is helpful to your Search Engine Optimization (SEO). Paragraph is just that: body text.
What’s useful to the search robots that scour the site for useful information are the H1, H2, H3, H4, H5 tags. These are Heading tags that call out the Sub-Headings in your post, making them second in importance to the post’s title. Visually they change the size of your Sub-Headings in reverse order, H1 being the largest. I like to use H3 for Sub Headings such as the ones in this article.
Tip: Be aware of Hard Returns and Soft Returns. With a Hard Return, when you hit Return at the end of a paragraph, your cursor will skip a line, like double space. With a Soft Return, press Shift + Return and your cursor will go to the next line, like single spaced.
 Links
Links
Placing links is an integral part of blogging because it propogates the web effect that makes the World Wide Web so expansive. You must place at least one outgoing link to your post, and to be more fancy, find a place to put an internal link to another page in your site.
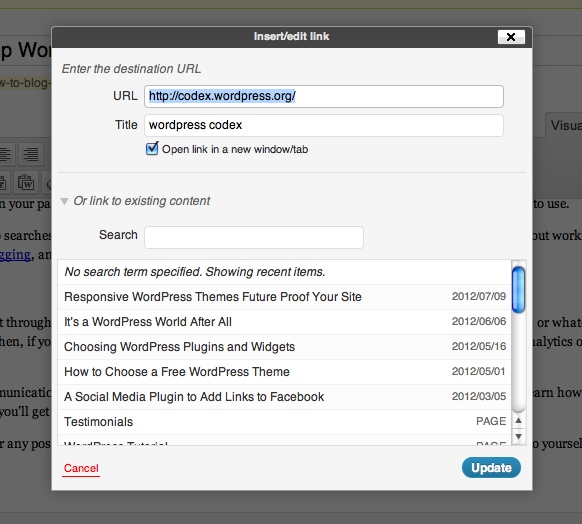
To link, select the word or phrase and click on the chain link icon above. In the window, enter the URL as well as the title of the site. If it is outgoing, alway check the “Open in a new window” box. If it is an internal link, don’t do that. You can also use the “Link to existing content” option by searching or scrolling to find an internal page or post, and clicking on one of them. WordPress will insert the URL and the title. Easy!
Media
To add a photo or document (videos are more problematic) place your cursor where you want it to appear, and hit the Upload/Insert camera icon. This takes you to a window with options for Computer, URL and Media Library. Before uploading from your computer, make sure your image is formatted appropriately at 600 pixel or less. 3000 pixel images are a drag on the system.
Follow the steps to upload and when the Media Library window pops up, enter the relevant information using keywords. A descriptive Title, keyword and URL in Alt Text, a caption if necessary (though it can sometimes complicate) and a keywordy description that you would be proud to read on a Search Engine Results Page (SERP). If you want your text to wrap around the image, choose Left, Center or Right. Choose a size and click on “Insert into post.” If you want your image to appear on the Blog’s Index page (where the posts of each category are collected), click on Featured Image and close the box. The featured image may not appear on your post page, depending on the theme, but it will accompany your excerpt around the site. For more tips on photos, see 5 Ways to Post Photos on Your Blog.
Categories
What drives the blog posts around the site are Categories, located in the sidebar to the right. Navigation tabs can be used to bring up all posts from one category. Whole index pages can be created for one category. So it’s important to choose your category wisely, and on a group site, use the proscribed categories created by the Administrator.
Tags
Tags are the keywords of your article that search engine robots use to index the site. The tag field is located just below Categories. WordPress automatically creates a tag cloud of the most heavily used tags on your site, so click on this option to begin with. Enter keywords separately by commas. You can see the tags as they are entered and they can be deleted by clicking on the X.
SEO
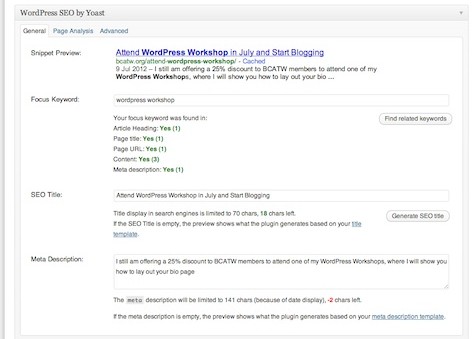
 If your site has an SEO tool, use it. The fields appear directly below the Edit Post box. I have used the All-in-One SEO plugin on many sites I’ve created, but now I’m onto WordPress SEO, which is more fun and interactive. It shows you what your saved post will look like in a SERP.
By entering a focus keyword or phrase, a SEO Title that may or may not be the same as your post title, and a Meta Description, you have full control of how the search engines index and present your page. WordPress SEO gives you feedback about your keyword usage and if you click Page Analysis, it will offer color-coded tips on how to optimize your post. Green is good, yellow is ok, red is bad, and grey means no SEO was done.
If you want to improve your SEO, see Search Engine Optimization For Blog Writing Using Inbound Writer
Other Setting
Excerpt – enter a sentence or two from the post. This info may appear on the category index page, so choose it wisely.
Send Trackbacks – enter the URL of the site you linked to in order to notify them of the link. Maybe they will link back.
Slug – a shortened, SEO-friendly title of your post.
Author – set your name here by pulling the dropdown menu. If you don’t like how your name reads, go to Your Profile in the navigation bar and use the drop down menu to pick a version of your name that you like. Then, back on the Edit Post pages, select it in the Author drop-down menu.
If these last few things don’t appear on your page, go to the top right and pull down Screen Options and check the options you want to use.
For more tips on using a WordPress blog, do searches on the WordPress Codex, a rich and extensive repository of information.
Social Media
After you publish your post, you should promote it through social media. Copy the post page’s link and drop it into Facebook, Twitter, and LinkedIn. Pin the picture on Pinterest. Then, if your group’s site features Jetpack stats, you can view analytics of your post in the Dashboard. To make Facebooking a lot easier, here’s A Social Media Plugin to Add Links to Facebook
WordPress is a powerful tool for communications within a membership organization as well to the outside world. The sooner you learn how to post on a group WordPress blog site, the faster you’ll get your message out.
If you have any questions about this or any post, please leave a comment below. Sending a private email will only keep the answer to yourself, which is the antithesis of blogging.
Blog on!

